OBD Autel MS906
General Introduction
The MaxiSys® Autel MS906 is an advanced diagnostic device developed for customers looking for a tool with ultra-convenient and modern design while still delivering ultimate performance. Featuring the powerful Samsung Exynos 5260 6-core processor (1.3 GHz quad-core ARM Cortex-A7 + 1.7 GHz dual-core ARM Cortex-A15), and an 8.0 inch LED capacitive touch screen, based on the multitasking operating system, and combined with the best possible coverage of OE-level diagnostics, the MaxiSys MS906 is the ideal solution to manage your repair jobs smartly and conveniently with greater integration. This manual describes the construction and operation of the device and how it works to deliver diagnostic solutions
Accessory Kit
Main Cable The display tablet can be powered through the Main Cable when connected to an OBD II/EOBD compliant vehicle. The Main Cable connects the display tablet to the vehicle’s data link connector (DLC). General Introduction Accessory Kit 7 Figure 2-4 Main Cable – 1.7 m in length 2.2.2 OBD I Adapters The OBD I adapters are for Non-OBD II vehicles. The adapter used depends on the type of vehicle make being tested. The most common adapters are shown below. Benz-14 Chrysler-16 BMW-20 Kia-20 Nissan-14 GM/Daewoo-12 Honda-3 VW/Audi-2+2 Mitsubishi/ Hyundai -12+16 Benz-38 PSA-2 Fiat-3
Other Accessories AC/DC External Power Adapter Connects the display tablet to the external DC power port for power supply. General Introduction Accessory Kit 8 Compact Disc (CD) Includes the User Manual, Printing Services Program etc. Cigarette Lighter Provides power to the display tablet through connection to the vehicle’s cigarette lighter receptacle, as some non-OBD II vehicles cannot provide power via the DLC connection. Clipper Cable Provides power to the display tablet through connection to the vehicle battery as some non-OBD II vehicles cannot provide power via DLC connection Lighter Fuse A safety device for the cigarette lighter
How to use Autel MS906?
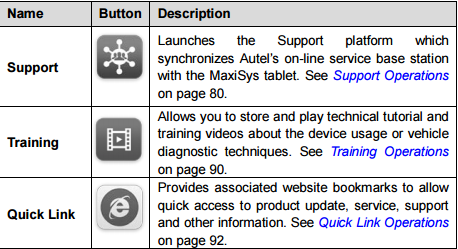
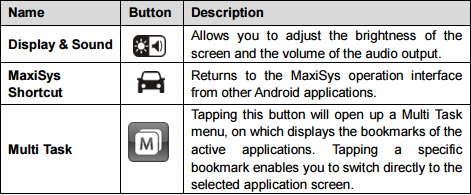
Powering Up Press the Lock/Power button on the top right side of the display tablet to switch the unit on. The system boots up, and shows the lock screen. Press and drag the inner ring to the edge of the circle to unlock the screen; the MaxiSys Job Menu is shown. Figure 3-1 Sample MaxiSys Job Menu 1. Application Buttons 2. Locator and Navigation Buttons 3. Status Icons NOTE: The screen is locked by default when you first turn on the display tablet. It is recommended to lock the screen to protect information in the system and reduce battery usage. Almost all operations on the display tablet are controlled through the touch screen. The touch screen navigation is menu driven, which allows you to quickly locate the test procedure, or data that you need, through a s eries of choices and questions. Detailed descriptions of the menu structures are found in the chapters for the various applications. Getting Started Powering Up 10 3.1.1 Application Buttons The Application buttons configure the MaxiSys for the type of operation or activity to be performed. The table below gives brief descriptions of the available applications. Use your finger tip to select an application from the Job Menu.

Locator and Navigation Buttons
Operations of the Navigation buttons at the bottom of the screen are described in the table below: Table 3-2 Locator and Navigation Buttons
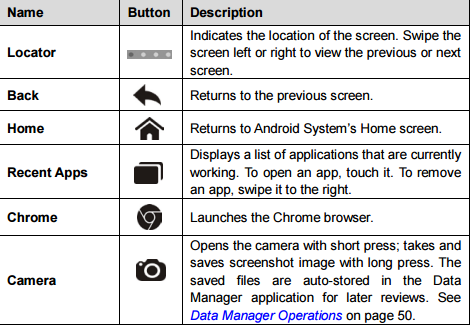
To use the camera: 1. Tap the Camera button. The camera screen opens. 2. Focus the image to be captured in the view finder. 3. Tap the inner blue circle. The view finder now shows the captured picture and auto-saves the taken photo. 4. Tap the thumbnail image on the top right corner of the screen to view the stored image. 5. Tap the Back or Home button to exit the camera application. Refer to Android documentation for additional information.
More information please Search:Maxisys MS906 User Guide Manual
How To Buy OBD2 Scanner